How to Connect Image Upload to Firebase Ionic 3
In this Ionic v/four tutorial, we will integrate Firebase services and see how to upload images in Ionic application with a progress bar indicator on the Firebase database.
This Athwart post is compatible with Angular iv upto latest versions, Angular 7, Angular viii, Angular 9, Angular x, Angular 11 & Angular 12
As we all know Firebase provides an crawly bundle of cloud services making the life of developers very easy. There is a broad range of tools available for next-level app development like Authentication, Testing, Analytics, Storage, Database, etc.
In this post, nosotros will create an Ionic Awarding with Image Upload feature with the Progress bar. It will also list already saved of Images. This application will focus on the two most important services of Firebase
How the Ionic App will Wait

Required Firebase Services
Firestore Database
Cloud Firestore by Firebase is a NoSQL database that is very fast and reliable. In Firestore data is saved in the course of Collection of Documents which can be a hierarchy of Collection Document up to any level. In database volition store Image Path, Name, and Size of uploaded image.
Firestorage Disk
Storage service tin save files of any type nether a provided Bucket name. In storage, we will save the actual Image uploaded by the user from the application.
Let's get-go edifice!
Create an Ionic Application
Offset, create a new Ionic application with a blank template using the latest Ionic CLI. Brand certain to update Ionic CLI past running the following command.
# Update Ionic CLI $ npm install -g @ionic/cli # Create new application $ ionic start ionic-firebase-paradigm-upload-app bare --blazon=angular #Movement inside the application directory $ cd ionic-firebase-image-upload-app Install AngularFire2 in Application
AngularFire2 is the official Angular library for Firebase. Using if nosotros can easily connect with Firebase services with the Ionic application.
Run following NPM command to install AngularFire2
$ npm install firebase @angular/fire --salve Import AngularFire2 in AppModule
Now open up the app.module.ts file to import the required Firebase services.
//app.module.ts import { NgModule } from '@athwart/core'; import { BrowserModule } from '@angular/platform-browser'; import { RouteReuseStrategy } from '@angular/router'; import { IonicModule, IonicRouteStrategy } from '@ionic/athwart'; import { SplashScreen } from '@ionic-native/splash-screen/ngx'; import { StatusBar } from '@ionic-native/condition-bar/ngx'; import { AppComponent } from './app.component'; import { AppRoutingModule } from './app-routing.module'; import { AngularFireModule } from '@angular/fire'; import { AngularFirestoreModule } from '@angular/fire/firestore'; import { AngularFireStorageModule } from '@athwart/fire/storage'; import { surround } from '../environments/environment'; @NgModule({ declarations: [ AppComponent ], entryComponents: [], imports: [ BrowserModule, IonicModule.forRoot(), AppRoutingModule, AngularFireModule.initializeApp(environment.firebase, 'my-app-proper noun'), // imports firebase/app needed for everything AngularFirestoreModule, // imports firebase/firestore, only needed for database features AngularFireStorageModule // imports firebase/storage simply needed for storage features ], providers: [ StatusBar, SplashScreen, //FileSizeFormatPipe, { provide: RouteReuseStrategy, useClass: IonicRouteStrategy } ], bootstrap: [AppComponent] }) export class AppModule {} Here we are using two services provided by Firebase, the AngularFireStorageModule which is used to store multimedia files and other files on a disk, and AngularFirestoreModule to save image file information in the NoSQL database.
If you check above nosotros are initializing the AngularFireModule with our Firebase application credential which we will keep in the Angular environment file. Let's quickly check the steps to create a Firebase project and get credentials to connect our Ionic application with the Firebase project.
Create a Firebase Project & Enable Services
To create a project click on "+ Add Project" after logging in your Google business relationship. And then fill project information and then click "Create Project".
Database Setup
Subsequently successful project creation, click on "Database" on the left sidebar to "Create database".
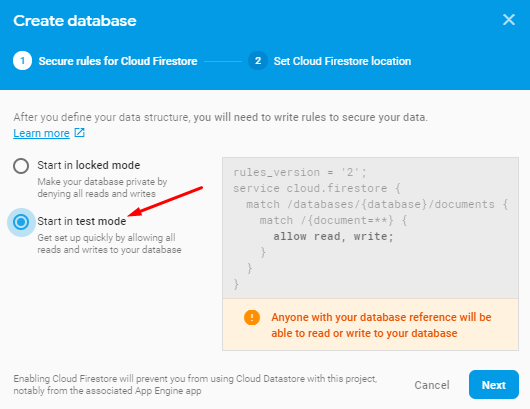
Select the "Start in test way" pick equally currently, we are non using Authentication, so this option volition permit us read/write. Merely make certain to modify this in a product application.
Annotation: If you lot get credential without creating Database then y'all will become fault "ERROR Error: No Storage Saucepan defined in Firebase Options."
Storage Setup
Now we demand to alter Rule in storage besides otherwise you will get the following error "Firebase Storage: User does not have permission to access 'freakyStorage/1563691783666_ABC.png'. "
Click on " Storage " on the left sidebar, striking " Get Started " >> "Adjacent" >> "Done". Now click on the "Rules" tab then change
allow read, write: if request.auth != goose egg; to
allow read, write: if request.auth == cipher; And so click "Publish".
Get Firebase Project Credential & Configure in Ionic
Where to find Credentials in Firebase?
To get credential, click on "Project Overview" then click on "Web" icon then fill up some details and then "Annals app"

Adjacent, y'all will run across credentials

Save Firebase Credentials in Angular App Environment File
Re-create the values and so paste in "~environments/environment.ts" file in the application root.
//environment.ts export const environment = { production: faux, firebase: { apiKey: "AIzaSyDPihZfC8Ixuet47cfoPg22RnY6df7pQ-4", authDomain: "exam-ff7b4.firebaseapp.com", databaseURL: "https://test-ff7b4.firebaseio.com", projectId: "test-ff7b4", storageBucket: "test-ff7b4.appspot.com", messagingSenderId: "892903466231", appId: "1:892903466231:web:b629ab121e5c608c" } }; Implement Image Upload
Finally, let's start the implementation of the Image upload characteristic in our Ionic awarding. As our application is having a blank template and then information technology already has a Home component.
Update Home Component Class
In the habitation.component.ts file place the following code.
import { Component } from '@athwart/core'; import { AngularFireStorage, AngularFireUploadTask } from '@angular/fire/storage'; import { AngularFirestore, AngularFirestoreCollection } from '@angular/fire/firestore'; import { Observable } from 'rxjs'; import { finalize, tap } from 'rxjs/operators'; consign interface MyData { proper name: string; filepath: string; size: number; } @Component({ selector: 'app-home', templateUrl: 'domicile.page.html', styleUrls: ['home.page.scss'], }) consign grade HomePage { // Upload Task task: AngularFireUploadTask; // Progress in per centum percentage: Appreciable<number>; // Snapshot of uploading file snapshot: Observable<whatever>; // Uploaded File URL UploadedFileURL: Observable<string>; //Uploaded Image Listing images: Observable<MyData[]>; //File details fileName:string; fileSize:number; //Status check isUploading:boolean; isUploaded:boolean; private imageCollection: AngularFirestoreCollection<MyData>; constructor(individual storage: AngularFireStorage, private database: AngularFirestore) { this.isUploading = false; this.isUploaded = faux; //Set collection where our documents/ images info will save this.imageCollection = database.drove<MyData>('freakyImages'); this.images = this.imageCollection.valueChanges(); } uploadFile(event: FileList) { // The File object const file = event.item(0) // Validation for Images Only if (file.type.separate('/')[0] !== 'image') { console.error('unsupported file type :( ') render; } this.isUploading = truthful; this.isUploaded = false; this.fileName = file.name; // The storage path const path = `freakyStorage/${new Date().getTime()}_${file.proper name}`; // Totally optional metadata const customMetadata = { app: 'Freaky Image Upload Demo' }; //File reference const fileRef = this.storage.ref(path); // The main task this.task = this.storage.upload(path, file, { customMetadata }); // Go file progress per centum this.percent = this.task.percentageChanges(); this.snapshot = this.task.snapshotChanges().piping( finalize(() => { // Get uploaded file storage path this.UploadedFileURL = fileRef.getDownloadURL(); this.UploadedFileURL.subscribe(resp=>{ this.addImagetoDB({ proper noun: file.name, filepath: resp, size: this.fileSize }); this.isUploading = false; this.isUploaded = true; },error=>{ panel.error(error); }) }), tap(snap => { this.fileSize = snap.totalBytes; }) ) } addImagetoDB(image: MyData) { //Create an ID for certificate const id = this.database.createId(); //Gear up document id with value in database this.imageCollection.doc(id).ready(image).then(resp => { console.log(resp); }).catch(error => { console.log("mistake " + error); }); } } In the Home component class, import Storage and Firestore packages. Connect to FireStore collection and subscribe to the valueChanges() method to get a snapshot of an updated list of images from Database. "freakyImages" is the name of collection which will be created if not exist.
The uploadFile() method will offset validate file type then call this.storage.upload(path, file, { customMetadata }); to start uploading the file. The percentageChanges() returns percentage condition of file uploading.
Subscribe to snapshotChanges() to get file upload progress and finalize() having addImagetoDB() method which saves the details to the database.
Update Domicile Template
For the abode component template, we have three sections.
Choose Image
Outset one shows Image upload control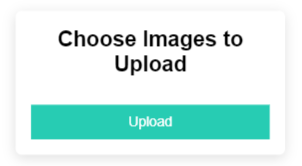
<ion-bill of fare form="ion-text-center" *ngIf="!isUploading && !isUploaded"> <ion-carte-header> <ion-card-title>Choose Images to Upload</ion-card-title> </ion-carte du jour-header> <ion-card-content> <ion-button color="success" shape="round" size="large"> <span>Select Image</span> <input id="uploadBtn" blazon="file" class="upload" (change)="uploadFile($effect.target.files)" /> </ion-button> </ion-card-content> </ion-bill of fare> The 2d shows the progress with percentage bar and total file size and the number of data transferred.
<ion-card class="ion-text-center" *ngIf="isUploading && !isUploaded"> <ion-card-header> <ion-card-title>Selected File:<b>{{ fileName }}</b></ion-card-title> </ion-carte-header> <ion-carte du jour-content> <div *ngIf="percentage | async every bit pct"> Progress: {{ pct | number }}% <ion-progress-bar value="{{ per centum / 100 }}"></ion-progress-bar> </div> <div *ngIf="snapshot | async as snap"> File Size: {{ snap.totalBytes | fileSizePipe }} Transfered: {{ snap.bytesTransferred | fileSizePipe }} <div *ngIf="snapshot && snap.bytesTransferred != snap.totalBytes"> <ion-button color="alarm" size="pocket-size" (click)="chore.interruption()" class="button is-warning">Pause</ion-button> <ion-button size="modest" (click)="task.resume()" class="button is-info">Resume</ion-button> <ion-button color="danger" size="minor" (click)="chore.abolish()" class="button is-danger">Cancel</ion-button> </div> </div> </ion-card-content> </ion-card> Uploaded Image Card with Download Button
The tertiary section shows the uploaded image with the download file link.
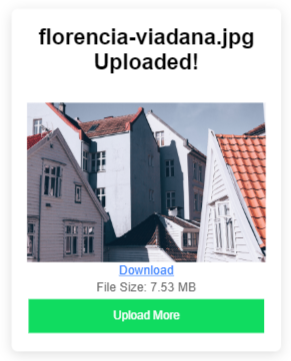
<ion-menu course="ion-text-center" *ngIf="!isUploading && isUploaded"> <ion-carte du jour-header> <ion-card-championship> <b>{{ fileName }}</b> Uploaded! </ion-card-title> </ion-carte du jour-header> <ion-card-content> <div *ngIf="UploadedFileURL | async as url"> <img [src]="url" /> <a [href]="url" target="_blank" rel="noopener">Download</a> </div> File Size: {{ fileSize | fileSizePipe }} <ion-button expand="full" color="success" (click)="isUploading = isUploaded = false">Upload More</ion-button> </ion-card-content> </ion-menu> Complete abode.page.html will have the following HTML content.
<ion-header> <ion-toolbar color="third"> <ion-title> Firestore Image Upload </ion-title> </ion-toolbar> </ion-header> <ion-content class="ion-padding"> <ion-card class="ion-text-heart" *ngIf="!isUploading && !isUploaded"> <ion-menu-header> <ion-card-title>Choose Images to Upload</ion-card-title> </ion-menu-header> <ion-bill of fare-content> <ion-button colour="success" shape="circular" size="large"> <span>Select Epitome</span> <input id="uploadBtn" blazon="file" form="upload" (change)="uploadFile($event.target.files)" /> </ion-button> </ion-bill of fare-content> </ion-menu> <ion-card class="ion-text-center" *ngIf="isUploading && !isUploaded"> <ion-card-header> <ion-carte du jour-championship>Selected File:<b>{{ fileName }}</b></ion-card-title> </ion-card-header> <ion-card-content> <div *ngIf="pct | async as pct"> Progress: {{ per centum | number }}% <ion-progress-bar value="{{ percent / 100 }}"></ion-progress-bar> </div> <div *ngIf="snapshot | async equally snap"> File Size: {{ snap.totalBytes | fileSizePipe }} Transfered: {{ snap.bytesTransferred | fileSizePipe }} <div *ngIf="snapshot && snap.bytesTransferred != snap.totalBytes"> <ion-button color="warning" size="pocket-sized" (click)="task.pause()" grade="button is-warning">Intermission</ion-push> <ion-button size="pocket-sized" (click)="job.resume()" class="button is-info">Resume</ion-button> <ion-button color="danger" size="pocket-size" (click)="task.cancel()" grade="push button is-danger">Cancel</ion-button> </div> </div> </ion-card-content> </ion-card> <ion-card class="ion-text-center" *ngIf="!isUploading && isUploaded"> <ion-carte-header> <ion-card-title> <b>{{ fileName }}</b> Uploaded! </ion-card-championship> </ion-card-header> <ion-card-content> <div *ngIf="UploadedFileURL | async as url"> <img [src]="url" /> <a [href]="url" target="_blank" rel="noopener">Download</a> </div> File Size: {{ fileSize | fileSizePipe }} <ion-button expand="full" color="success" (click)="isUploading = isUploaded = false">Upload More than</ion-button> </ion-card-content> </ion-card> <h2 form="ion-text-center">Uploaded Freaky Images</h2> <ion-card color="lite" grade="ion-text-center" *ngFor="let item of images | async"> <ion-card-header> <ion-card-title> {{ item.proper noun }} </ion-card-championship> </ion-menu-header> <ion-card-content> <img [src]="item.filepath" /> <a [href]="item.filepath" target="_blank" rel="noopener">Download</a> </ion-card-content> </ion-card> </ion-content> Image Size Pipe Filter
In HTML at that place is "fileSizePipe" used to convert bytes of file size into a readable format. Add this pipe file file-size-format.pipe.ts in the home component folder
//file-size-format.pipe.ts import {Pipe, PipeTransform} from '@angular/cadre'; const FILE_SIZE_UNITS = ['B', 'KB', 'MB', 'GB', 'TB', 'Pb', 'EB', 'ZB', 'YB']; const FILE_SIZE_UNITS_LONG = ['Bytes', 'Kilobytes', 'Megabytes', 'Gigabytes', 'Pettabytes', 'Exabytes', 'Zettabytes', 'Yottabytes']; @Piping({ name: 'fileSizePipe' }) export class FileSizeFormatPipe implements PipeTransform { static forRoot() { throw new Error("Method not implemented."); } transform(sizeInBytes: number, longForm: boolean): string { const units = longForm ? FILE_SIZE_UNITS_LONG : FILE_SIZE_UNITS; let power = Math.circular(Math.log(sizeInBytes)/Math.log(1024)); power = Math.min(power, units.length - 1); const size = sizeInBytes / Math.pow(1024, ability); // size in new units const formattedSize = Math.circular(size * 100) / 100; // proceed up to 2 decimals const unit = units[power]; render `${formattedSize} ${unit of measurement}`; } } Thanks to this Plunker
Also, import this Pipage in dwelling house.module.ts file
//domicile.module.ts import { NgModule } from '@angular/core'; import { CommonModule } from '@athwart/mutual'; import { IonicModule } from '@ionic/angular'; import { FormsModule } from '@angular/forms'; import { RouterModule } from '@angular/router'; import { HomePage } from './dwelling house.page'; import { FileSizeFormatPipe } from './file-size-format.pipe'; @NgModule({ imports: [ CommonModule, FormsModule, IonicModule, RouterModule.forChild([ { path: '', component: HomePage } ]) ], declarations: [HomePage,FileSizeFormatPipe] }) export course HomePageModule {} Run Awarding
That's it… now effort running the app in the browser
$ ng serve --open Source Code
Discover the source code of this tutorial in my GitHub repository here.
Decision
In Ionic Awarding above we created a fully functional demo with Epitome Uploader control showing progress and snapshot of database images. Firebase provides many tools that can be easily incorporated in Ionic application to create high-end features filled with Google awesomeness.
Source: https://www.freakyjolly.com/ionic-4-image-upload-with-progress-in-firestore-and-firestorage-tutorial-by-application/
إرسال تعليق for "How to Connect Image Upload to Firebase Ionic 3"